 Home - How-To's - Reviews - Links - Contact - About Us
Our other sites: FlyingRC.net - NewWoodworker.com - NewMetalworker.com
Home - How-To's - Reviews - Links - Contact - About Us
Posted – 12-13-2017
This is another instance where my “warts and all” philosophy on running web sites has me falling on my own sword. Despite the simplicity of winding bobbins, I (and I hope some of you) have been able to screw this up enough to compromise the performance of an otherwise perfect sewing machine. All it takes is to be equipped with one of my “almost right” bobbins. Making this more of a “guy” issue is that the instructions packed with most sewing machines are rather good which to testosterone-laced brains makes them unnecessary, like all instruction manuals.
I know his sounds overly simplistic, but we do need to use the proper bobbin for the sewing machine we have in front of us. There are small differences in the shape and size of some bobbins that can cause impressively large thread balls in the sewing machine that is about to grind to a bound-up stop.
Bobbins are very cheap which allows us to keep a good supply of them. Because the bobbins are wound on the sewing machine, it is common for people to have a bunch of extra bobbins, often pre-loaded with the common color threads they frequently use. Bobbins seem to have some level of intelligence that lets them run out in the middle of a long row of stitches when it is most frustrating. Having to take the work out of the machine to wind more bobbins just adds to that frustration. Having spare, pre-loaded bobbins makes way more sense than I originally thought. I have many, will have many more.
Older sewing machines had a clutch, usually built into the handle that moved the needle up and down. We had to loosen a section of that round handle to disengage the needle drive so that is not flailing away while we are winding bobbins on the other end of the machine. In my experience, that clutch also knew exactly when to loosen up on its own, so the needle started acting “funny” while sewing. I usually tried to power my way to the end of that line of stitches when that happened but rarely made it.
Most newer sewing machines have eliminated this clutch mechanism. Now when we move the bobbin-loading drive towards the bobbin-filling stop, the needle drive is automatically disengaged. When the bobbin-loading drive is moved back to its normal position the needle system is once again active. I know this sounds like an insignificant bit of automation but if you lived through the “clutch era” this is a welcomed design advancement.
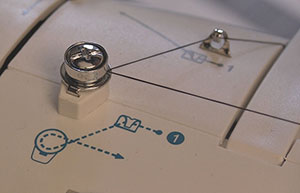
To wind bobbins we need to thread that system correctly. Another of the modern sewing machine features that I like is the threading paths printed directly on the machine housing next to those components. This thread path usually includes wrapping the thread around or through a tensioning disk that adds the correct amount of tension as the bobbin loads.
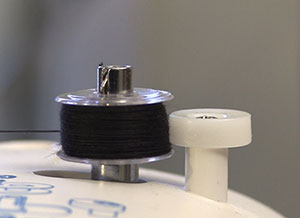
Bobbins have a hole in the flange someplace through which we insert the end of the thread. We must hold this tail through the side of the bobbin during the initial winds to lock the thread in place on the hub of the bobbin. Once a few layers of thread are wound onto the bobbin that tail can be trimmed off close to the outer surface of the bobbin. Then the bobbin can be fully loaded without worry of the thread loosening up.

There appear to be as many opinions on how full a bobbin should be as there are bobbins. Most bobbin systems have a plastic fixture that stops bobbin loading when it reaches a certain level. Some of these “stops” are secured by a screw in the center. If the stop is shaped like an eccentric, you can probably turn it to either reduce the amount of thread wound onto the bobbin or increase it. I set my bobbin stop so that the thread load tops out about 1/16” below the outer edge of the bobbin. My thinking is to prevent the thread from coming off the bobbin in loops over the edge rather than being pulled off normally. I have no proof of this working other than since I adopted that fill level I’ve not had a bit of bobbin trouble. Of course, I am doing all this on a much better machine so who knows. I am a guy, this is a machine and I conquered it. So let it be written, so let it be done.
Some folks like to use a fingertip to gently guide the thread as it is pulled onto the bobbin. They are doing so to keep the level of thread even on the bobbin to prevent issues when it is pulled off while sewing. I just “gas” it with the foot pedal and watch. With the newer sewing machines, I have never had a bobbin feed issue even though I have not guided the thread on any of the hundreds of bobbin-loads I have used. I think that someplace between keeping the overall thread load slightly below the outer diameter of the bobbin, not messing with the built-in thread tension or how the thread naturally goes on the bobbin, “steering” the thread onto the bobbin is wasted effort. If you have issues with the thread coming off the bobbin, you might consider guiding the thread during loading. I can’t say (with confidence) that it won’t help.
When I began outfitting my shop with reasonably current equipment I noticed lots of sales pitches involving what appeared to be packages containing huge numbers of pre-loaded bobbins. I must admit thinking these offers were aimed at the lazy rather than rational folk in the sewing world. My view has changed.
Now that I have sewing machines that sew way more than needing fixing, I am going through more bobbins in less time than I anticipated. That means having to stop, wind another bobbin, and then get back to the task at hand. Slowly the concept of maintaining a bunch of pre-loaded spare bobbins was making more sense.
Being able to just grab a full bobbin with which to replace the now empty one makes lots more sense. This is true especially with the newer bobbin systems that let us make such a change very quickly, often without having to remove the work piece from the machine.
Filling bobbins correctly should be a no-brainer, even for us guys. The act of re-filling a bobbin goes very quickly, and we get to mash a very “throttle-like” pedal so this procedure should appeal to guys on a couple levels. Having bobbins loaded with our commonly used makes changing the thread out to match the job easier which means we are more likely to do it rather than living with oddly contrasting stitches.
Get some extra bobbins (the right ones), fill them per the instructions (and thread path) for your machine and then go back to sewing without worry. Bobbins used to be the source of many problems, but modern sewing machines have made them a virtual non-issue if you read that instruction manual – in private if you are a guy.
See our video on this task - Click Here
Have a comment on this story? –Email Me!
All yesmensew.com written, photographic and drawn materials are property of and copyright by Tom Hintz and NewWoodworker.com LLC 2013-2019. Materials cannot be used in any way without the prior written permission of the owner.