Buying edging/bias tape by the typical 3-yard retail package is fine when we need one or two of them for a project. However, the sewing world has lots of people like myself who use enough edging/bias tape to make producing it “in-house” worth the effort. I am fortunate that for me, making my own edging/bias tape is as enjoyable as the projects on which it is sewn. A big point that justifies making my own edge/bias tape is that I save a good bit of money in the process. My sewing budget is always happy to hear I am saving money.
I know there is a “discussion” (people yelling at me) regarding just what edging/bias tape is. Many believe that it is a specific kind of fabric, cut on an angle (45-degrees usually), hence the “bias” nomenclature. I have tried making bias tape, from a few types of fabric, cut on that bias and have seen no benefit in how it works on my projects as compared to the straight-cut tapes I’ve been making. Whether applied to straight or relatively curved edges my straight edging tape works fine. For our purposes here, I call my shop-made tapes “edging”. My shop, I make the rules!
Making edging tape this way doesn’t require a load of fancy tools. Being accurate and consistent are crucial but don’t have to cost a ton of money. A little practice making the cuts and ironing the tape speeds the process considerably and is why I usually make a bunch of edging tape in one sitting.
I have been buying Fabric Editions 2-Yard Pre-cut Fabric Palette, 42 by 72-Inch, because it is light weight, finely woven and 100% cotton. I purchase these packages of fabric two or three at a time, so I can make a bunch of edging tape at on time. See Resources below for a link that will show you the current price.
The Process
Having a logical sequence for any task can be important for efficiency that saves time and money. Making edging is no different. Since I make lots of edging at a time, the amount of time and money saved grows proportionately.
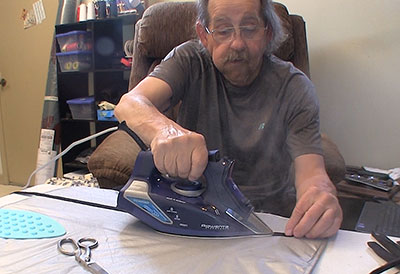
The first step is to prepare the fabric. I fold the fabric so that I can cut on the long dimension (72”) and then iron the “stack” good and flat. Wrinkles can cause issues both in the final dimensions and getting the fabric started in and through the Tape Maker Tool. Wrinkles in the fabric can also cause it to exit the Tape Maker Tool with wrinkles. Since I began ironing the fabric in its folded state with the Rowenta Steamforce Iron I have had virtually no problems with the tape as it exits the Tape Maker Tool.
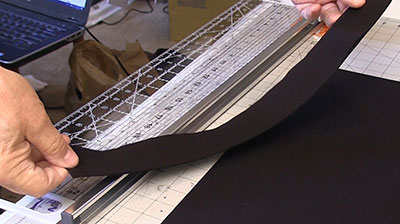
My Fiskars Rotary Cutter and Ruler Combo cuts through several layers of the Fabric Editions 2-Yard, 72”-wide Pre-cut Fabric so I fold it to get a four-layer piece with a width I can cut in one pass. I found out that if you try to hurry cutting several layers of fabric even a super-sharp rotary blade can ride up on the stack and fail to cut a spot or two. Go a bit slower and it makes consistent-width pieces with clean edges. Cutting 2”- wide strips I was able to get 20, 72”-long pieces of fabric ready for going through the Tape Maker Tool.
Using the Bias Tape Maker Tool
When I bought my Bias Tape Makers nobody seemed to know how wide the strip of fabric must be to be compatible. I finally came across a woman on the Internet that said to cut the fabric twice as wide as the exit opening on the Bias Tape Maker. Works like a charm. I think I had been way over thinking this….
Using the Tape Maker Tool can take a little getting used to. First make a 45-degree cut on one end of the 2”-wide strips. That “point” makes it a ton easier to get the fabric started. Feed the fabric into the back of the Tape Maker Tool until you can grasp the pointed “tail” and begin pulling the fabric through. Moving the fabric in and out of the Tape Maker Tool a bit makes getting its full width engaged in forming passages in the Tape Maker Tool easier and faster most times. The first few inches of the fabric strip are usually wasted but that appears to be unavoidable and has little impact on the overall money savings over store-bought tapes.
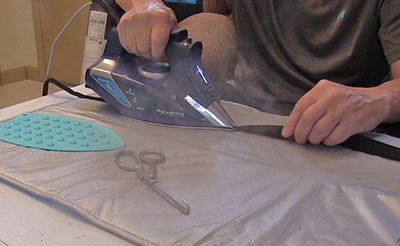
Once the fabric is coming out of the Tape Maker Tool correctly I begin ironing it flat with my steam iron held very close to the exit of the tool. How fast to move the Tape Maker Tool and how to hold your iron in relation to the tool takes a little experimenting but even when figuring all this out I think I junked out only three strips of fabric.
I had been using our $20-something steam iron when I first started making edging tape but on the advice of a friend stepped up that technology with the addition of a Rowenta, Steamforce #DW9280. Though not cheap, its performance is in a different world. I will have a full review of the Rowenta Steamforce Iron on this site soon. Suffice it to say the tapes come out from under this iron very flat with zero tendency to “unfold” as happened constantly with the previous iron. Chalk this up to the right tool for the job - again.
Trim and the Final Fold
Most of the strips I make have a couple inches at one or both ends that I trim off, usually because the end is misshapen. This happens a lot of the end first going into the Tape maker tool. Plus, remember that we cut that end at a big angle to help get it started. Considering the amount of time and money I am saving, whacking a little from either end of the strips is a small price to pay, so to speak.
The final operation is folding the tape in half once more to reach its final configuration. While there is no tool I am aware of for this operation doing it by eye is rather easy, particularly with a good steam iron that “sets” the fabric in that shape. With the tight, clean edges the Rowenta Steamforce Iron makes installing the edge tape is easier as well. Aside from the labor of making the tape, there are no downsides to this homemade edging tape that I am aware of.
Conclusions
Making my own edge tape has been nothing but a positive thing in my work. I am saving a bunch of money, I can stockpile large quantities of edge tape produced in one afternoon and not get caught without a piece of edge tape needed to finish a project.
Aside from the Rowenta Steamforce Iron (used frequently in many sewing projects) the cost to produce the edge tape is small and is offset in multiples over what I would be paying at the fabric store or on-line for ready to use edge tape. I’ve had people tell me that my edge tape won’t work but I have not had any problems. Perhaps I will run into a rounded edge that will be problematic but since I am designing the things I make, I can try to work around that type of edge or will spring for a package of the factory-made stuff in those rare occurrences.
Resources
See our video on this product - Click Here
Have a comment on this story? –Email Me!
Back to the How-To List
All yesmensew.com written, photographic and drawn materials are property of and copyright by Tom Hintz and NewWoodworker.com LLC 2013-2019. Materials cannot be used in any way without the prior written permission of the owner.
Privacy Statement
 Home - How-To's - Reviews - Links - Contact - About Us