 Home - How-To's - Reviews - Links - Contact - About Us
Our other sites: FlyingRC.net - NewWoodworker.com - NewMetalworker.com
Home - How-To's - Reviews - Links - Contact - About Us
Text, photos and video by Tom Hintz
Posted –12-9-2017
We have options in the types of closures we use in our sewing projects. However, the trusty zipper remains a favorite choice for many applications, including the opening of RC plane wing bags. I have tried snaps and various hook and loop closure configurations, but none equal the versatility and ease of operation of a good quality, properly installed zipper.
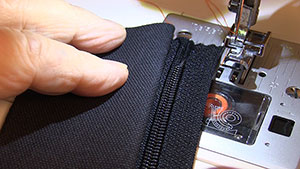
Zippers are available in many colors, designs, lengths and levels of quality. In addition, zippers are available with teeth and sliding hardware made from everything from cheap plastic to several types of metals. Naturally, the better-quality zippers cost more but in terms of the overall project, that expense is not a big concern for most, especially when function and durability are important.
When I was unable to find a proper length zipper (around 8-feet-long) for a one-piece warbird wing bag I came across the Sullivan “Make-A-Zipper” kits. The heavy-duty version that I use has 3-yards of continuous zipper and a dozen sliders. The zipper itself is fixed in a tough fabric base that allows sewing it into our project. For me the key with the Sullivan “Make-A-Zipper” kit feature is being able to cut the zipper to the exact length needed and save the remnants (official sewing term…) to be used in other projects along with the extra sliders. I usually install two sliders on wing bag zippers just for the convenience.
I should note that I like to make wing bags with a full-length opening because that makes it easier for me (and others) to get large, one-piece wings in without needing extra hands or damaging the wing while putting it into the protection which makes no sense whatsoever. You can get shorter, ready-made zippers that can be applied to smaller openings if you like. The installation process for most of those zipper types will be much the same as described here because I do not separate the sides of the zipper during installation.
I have seen zippers sewn directly on the fabric surface surrounding the opening. While this probably will work, at least over the short-term, it’s not the best way to do it in terms of durability and appearance. I frequently need to add a strip of fabric between the side panels to give the wing bag the necessary depth, particularly when accommodating two wing panels. That strip of fabric gave me the idea for the process used here and makes zipper installation a bit easier for me and hopefully for you.
Most of the time this strip is wide enough that I can split it down the center (lengthwise) and sew one half to either side of the zippers fabric backing. This lets me get two full-length lines of stitches on each side of the zipper for security, but it also produces a much cleaner-looking edge both at the zipper backing and the edge of the bag panels. This cleaner installation also allows the zipper to work smoothly.
Sewing tasks like this make me suspect that women might have an additional gene or something that makes these tasks less confusing than they are to guys. Many sewing procedures are more easily done if you can picture the finished task in your mind, even when working with the project inside out as so often happens in sewing. I must admit to lacking this kind of foresight, so I need to do things a few times to get familiar with it. For me, this repetitive learning process also gave me ample opportunity to get familiar with a seam ripper when I had to undo what I just did, sometimes a few times. But, even I can learn so have faith, go slow and pay attention to what you are doing. Remembering your sewing mistakes is just as important as recalling your thread-related successes.
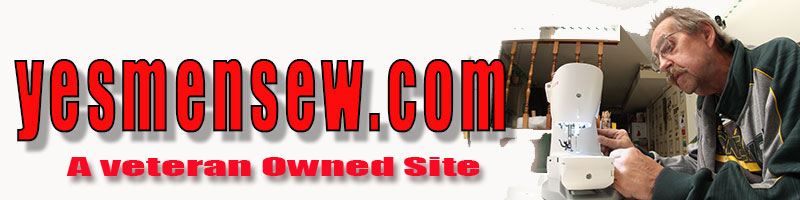
I also found that I can install the Sullivan “Make-A-Zipper” without separating the two sides as allowed with this type of zipper. Separating the sides is easy – getting them back together involves getting the slider back on both sides, with both side aligned, which is somewhere between frustratingly difficult and improbable in this lifetime, for me anyway. After rough-sizing the zipper I use my widest zig-zag stitch to create a barrier at each end of the zipper to prevent the sliders from taking a dive off the end of the lines of teeth, as they seem to want to do, particularly if you are not paying attention.
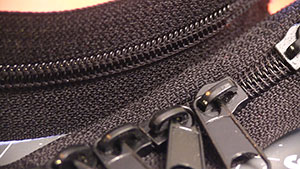
Studying the photos and video will be important to understanding the sew, fold and sew again steps I use. Although this will seem complicated to some, just about anyone will have that mystery fade as they do this a time or two. All we really are doing is hiding one line of stitches and using a second line to hold the fabric after it is folded dressing the seam up in the process. That second line of stitches also makes this attachment much tougher.
After sewing both sides of the zipper and checking to be sure they are oriented correctly, we can add the bags side panels with everything inside out. I use a bunch of stick pins to assemble the pieces of fabric, so everything stays together during the handling necessary to get the seams through the sewing machine being used. It is worth the time to check the orientation of all the panels to be sure they are correctly oriented so when the project is turned right-side-out after sewing everything is where we wanted them to be.
which is very handy but has the liability of being way complicated when things go wrong.
A regular sewing machine can be used to put the project together but will not finish the edges of the panels nor the layers if you use more than one as I do in these projects. It can be done on a regular sewing machine but making a second pass to enhance the strength of that seam will be a good idea.
Installing a Sullivan “Make-A-Zipper” kit is rather easy once you do it a couple times. For me, this effort is more than worth the resulting protector. I like the idea of producing durability and decent looks in a product I made in my own shop, for myself and others.
Since launching yesmensew.com I have received the expected flurry of comments about my “feminine side” along with several that are way cruder. They can take their shots. I am learning new skills and finding out how to apply them to making needed protectors in my shop, when it is snowing outside.
See our video on this product - Click Here
Have a comment on this How-To? –Email Me!
All yesmensew.com written, photographic and drawn materials are property of and copyright by Tom Hintz and NewWoodworker.com LLC 2013-2019. Materials cannot be used in any way without the prior written permission of the owner.